Introduction. TuFuse is a Windows command line program that creates extended dynamic range ("exposure blended") and extended depth of field ("focus blended") images. TuFuse uses a technique known as Image Fusion to combine the "best exposed" and/or "best focused" regions of multiple images into a single "fused" composite image.
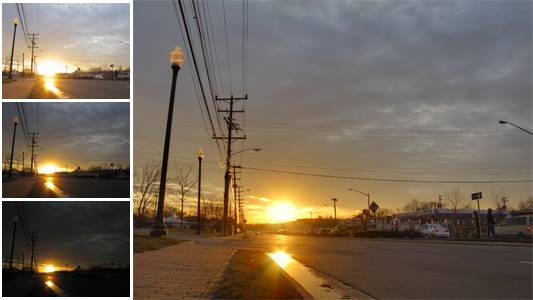
3 different images fused into a single exposure-blended composite.
Technical Background and Image Fusion Theory. TuFuse uses a modified version of a technique described in a 2007 paper by Tom Mertens, Jan Kautz and Frank Van Reeth: Exposure Fusion. The basic algorithm described in the Mertens-Kautz-Reeth paper (hereafter MKR) is to (1) assign a quality measure to all pixels in a series of aligned input images and (2) create a seamless composite image using a combination of the pixels from the input images where higher "quality" pixels contribute more to the final image. MKR suggests three methods for quantifying the "quality" of pixels, based on exposure, contrast and saturation. A combination of these three factors is used to assign a single "quality" measure to each pixel in the input images. The final composite image is created by using a weighted average of all the pixels in the input images (pixels with higher "quality" measures get more weight), combined seamlessly using a multi-resolution fusion technique first described 25 years ago by Peter Burt, Edward Adelson and others in a series of papers (See here, here and here). The Burt and Adelson procedure describes how an image can be decomposed into a series (or "pyramid") of frequency bandpassed images, and then recombined back into a single image. The MKR algorithm decomposes a series of input images into multiple pyramids, which are combined into a single pyramid based on pixel quality (i.e. how saturated, well exposed and/or well focused each pixel is), and finally collapsed to form a single composite image.
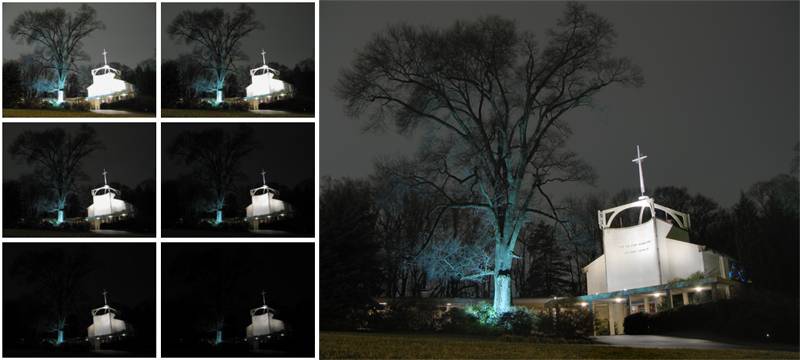
6 different images fused into a single exposure-blended composite.
The primary focus (no pun intended!) of MKR's paper is to identify the "best exposed" pixels in an image (i.e. those that aren't over or underexposed) and combine those into a single "extended dynamic range" image. Assigning a weight of 1.0 to the exposure measure, and weights of 0.0 to saturation and contrast achieves this result. Given a series of input images taken using different exposure settings, the resulting composite image contains more detail in highlight and shadow regions than any single input image. Unlike currently popular "High Dynamic Range" (HDR) techniques to creating images with more detail in shadow and highlight regions, the image fusion technique does not require the creation of an intermediate HDR image, followed by a "tone-mapping" process, and generally produces images that look more photographically realistic.
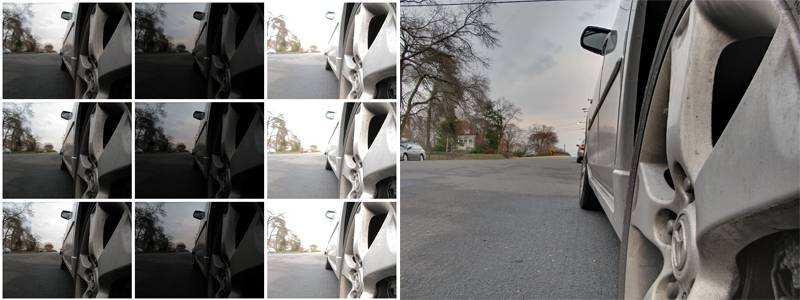
21 different images (only 9 shown here) fused into a single exposure and focus blended composite.
The technique isn't limited to identifying and combining images based on their exposure. In particular, the MKR algorithm is also very well suited to identifying and combining the best focused regions of images (using local contrast as a proxy for focus) into a single "extended depth of field" image. (In fact, Ogden, Adelson, Bergen and Burt described this in 1985, and Paul Haeberli discussed the approach in 1994). Similarly, the MKR algorithm can identify and combine images based on their saturation. In fact, there are multiple other criteria that could be employed to rate the "quality" of pixels and guide the image fusion process to create a composite image.
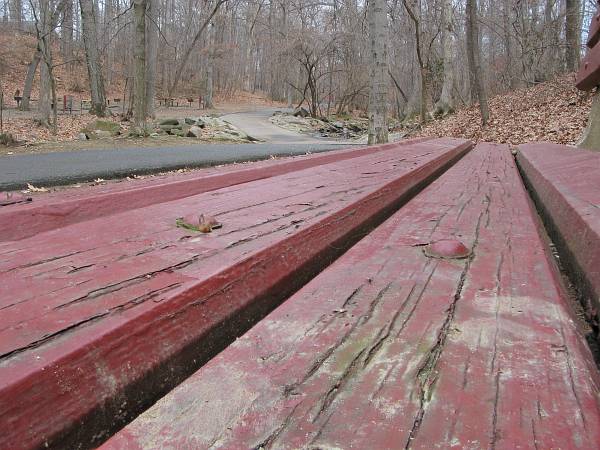
7 images fused into a single focus-blended composite, in focus from two inches to infinity
However, as far as most photographers are concerned, two criteria are particularly important: focus and exposure. Landscape photographers, in particular, struggle to capture images that are in perfect focus from foreground to background and are well-exposed throughout the scene. And, while the MKR algorithm can address either of these two concerns, it isn't optimally suited to addressing both simultaneously. The MKR algorithm creates combines pixels together in a single iteration. If one input image contains a well exposed, but poorly focused, pixel, it will still contribute to the final composite, even if a well exposed and well focused pixel is available in another intermediate image.
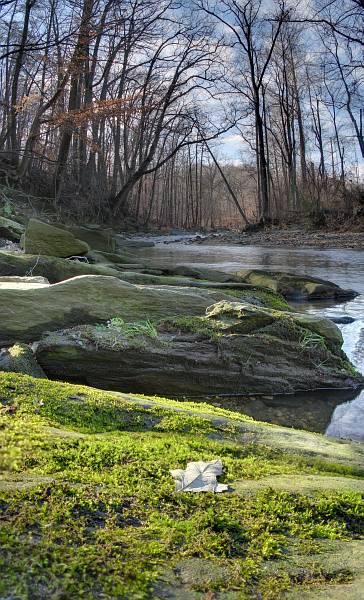
21 different images (not shown here) fused into three exposure and focus blended
composite images, and then stitched into a (vertical) panoramic image. Created by PTAssembler.
TuFuse: Extension to Existing Approaches. TuFuse extends the MKR algorithm by implementing a two stage image fusion process. In its first iteration, TuFuse performs focus blending on images that share the same (or similar) exposure. The objective of this first iteration is to create a series of intermediate images that contain the best focused regions from input images that share the same exposure. In its second iteration, TuFuse performs exposure blending on the intermediate images produced by the first iteration, and any other images that were not processed during the first iteration. Tufuse analyzes the input images, and automatically determines which images should be focus blended (iteration 1) and which images should be exposure blended (iteration 2). TuFuse uses different parameters for each of the two iterations, optimized to produce the best focused and best exposed result. Of course, TuFuse's two stage image fusion process can be bypassed and TuFuse can be made to perform the simple single stage image fusion process outlined by MKR. Similarly, if TuFuse does not detect any images with the same (or similar) exposure, the first iteration is skipped, and TuFuse performs a single exposure blending iteration on the input images.
TuFuse's default approach to focus blending differs from the approach suggested by MKR in a couple of other respects. First, Tufuse uses a weighted average of the three measures (contrast, exposure and saturation) rather than a power function when calculating the "quality" of each pixel in the input images. Second, TuFuse offers that ability to choose the "best" pixel (rather than a weighted average of "good" pixels) when combining the input images into a single pyramid. Using the best pixel (see the options for "laplacian combination mode" below) tends to produce superior results when performing focus blending.
Auto-bracketing. When performing exposure blending, TuFuse is designed to fuse multiple images taken at different exposures. However, it is possible to start with a single image, create a lighter and darker version of that image, and then perform image fusion on the three versions (original, lighter and darker). This technique (blending multiple versions of a single image) is sometimes known as "fake HDR" or "pseudo HDR". TuFuse can automate this process using a feature called as "auto-bracketing". When auto-bracketing is used, TuFuse creates a temporary lighter and/or darker version of each input image (adjusted by a user defined number of stops) and then fuses the two or three images into a single result. The resulting is an image in which shadows are brightened and/or highlights are darkened. If auto-bracketing is invoked, TuFuse only needs a single image as input.

1 image processed by TuFuse's Auto-bracketing feature into an exposure blended composite.
Intuitive Explanation of Image Fusion. Explaining how Image Fusions works simply is a challenge...a picture is probably worth more than a thousand words here! A reasonable approximation is that Image Fusion analyzes all input images, and creates a final composite that is a combination of the "best" parts of each input image Unfortunately, the "obvious" approach to combining the best parts of a series of input images (i.e. pick some pixels from one image and some pixels from another image) produces equally "obvious" transitions in regions where two (or more) different input images contribute to the resulting composite. It is necessary to smooth the transition between regions where two or more input images contribute to the result. When combining images of different exposures (or contrast or saturation), the Burt/Adelson pyramid approach (described above) performs this smoothing, retaining "local" contrast in transition regions (e.g. where light portions of the image meet dark portions), but lessening "global" contrast in regions where the scene is predominantly light or dark.

Varying the number of levels alters the adjustment of global contrast (see sky and road in top row) and local contrast (see "halo" around lamppost in bottom row).
The degree to which the Burt/Adelson approach adjusts contrast (globally and locally), and smoothes the transition between pixels from different images, depends on the number of levels in the pyramid that are used. TuFuse estimates the optimal size pyramid to (a) retain local contrast and (b) attenuate global contrast, but this can be adjusted by the user. In general, if too few levels are used, "halos" around regions of local contrast become visible (e.g. notice the slight "halo" around lamppost in level 5 image above), but if too many levels are used, the image will contain too much global contrast (e.g. see the dark road in the level 11 image above). The decision about the correct number of pyramid levels is at least as artistic as it is scientific, as it depends on factors such as the image's subject matter and personal preference.
Exposure Weight Curve. When performing exposure blending, TuFuse weights pixels based on how "well-exposed" they are. TuFuse uses an "exposure weight curve" to determine the appropriate weight to assign to a pixel based on its brightness or intensity. By default, the weight curve is constructed so that the closer a pixel's intensity is to a mid-tone (i.e. 0.5 on a scale of 0 to 1, where 0 is black and 1 is white), the more weight it is assigned. However, adjusting TuFuse's "beta" parameter shifts the curve left or right, and changes what TuFuse considers to be the "best exposed" values. For example, a beta value of less than 0.5 will cause TuFuse to favor darker pixels with higher weights, and values greater than 0.5 will cause TuFuse to favor brigher pixels when assiging weights.
TuFuse also allows adjustment of the "spread" of the exposure weight curve (via the "sigma" parameter). This alters the relative weights given to pixels that aren't well exposed (i.e. along the tails of the curve) compared to those that are well exposed (i.e. near the center of the curve). The following charts (generated using the "-C" command line option when invoking TuFuse) illustrate the impact of varying these two parameters on the exposure weight curve.
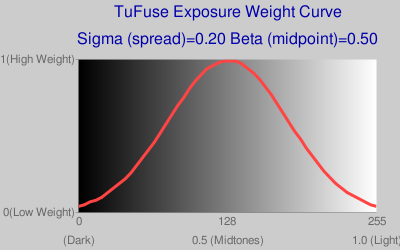
Default Exposure Weight Curve, Mid-tones get highest weights,
although some weight is also assigned to very dark and/or light pixels.
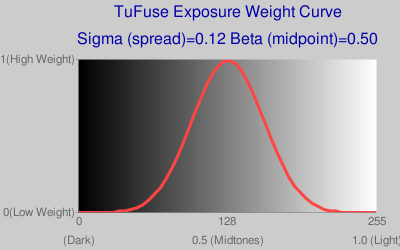
Sigma = 0.12, zero, or almost zero weight given to
very light/dark pixels at tails of curve.
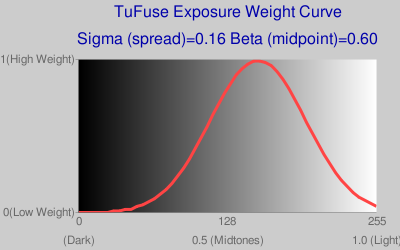
Beta = 0.6, curve shifted to the right so that lighter pixels
get higher weights relative to darker pixels.
Image Formats and RAW files. TuFuse writes output in TIFF (or "BigTIFF") format. TuFuse can read both 8 bit JPEG and 8/16 bit TIFF files as input. TIFF files should have 3 or 4 channels per pixel stored in strip format (i.e. most TIFF files). TuFuse can also read RAW files if DCRaw is installed. In order for TuFuse to read RAW files, DCRaw should be in the current directory (i.e. the directory from which TuFuse is executed), or available on the system path. If TuFuse is able to locate DCRaw then it can read any file format supported by DCRaw. DCRaw is not distributed with TuFuse. Check the DCRaw homepage for locations where Windows versions of DCRaw can be downloaded. Input file formats are identified by their extentions (e.g. ".jpg", ".tif", ".cr2", ".crw", etc.)
Tufuse Operation. Tufuse is a command line application. It is particularly suited to processing the output from PTAssembler and Panorama Tools, which can be used provide a graphical interface and perfectly align images before invoking TuFuse. TuFuse uses the fourth (or "alpha" channel) in a TIFF file to identify pixels to be used/ignored in the fusion process. If an alpha channel is present, any pixels with a zero alpha value are ignored. In no alpha channel is present, TuFuse assumes all pixels in the image should be used.
TuFuse is invoked as follows:
- TuFuse [options] input_file [input_file] [input_file] [...]
The following command line options are supported:
| General Options | |
| -o filename | Output filename. Output files are always TIFF (or BigTIFF) format. |
| -a n | Output bit depth. Valid choices = 8 or 16. By default TuFuse selects a value that matches the highest bit depth of any input image. |
| --compression x | x = LZW, DEFLATE or NONE (default=LZW). |
| ----bigtiff | Creates BigTiff output. |
| -l n | Specify number of levels to use when performing the Burt/Adelson pyramid process. Fewer levels shorten the transition region between light and dark areas, but may start to produce visible halos. Experiment to find best results. |
| -p n | Number of fusion iterations (1 or 2). Default=2. If two stage fusion is performed, the first stage is used to blend images that have the same or similar exposure (see -e). The second stage is used to blend the images resulting from the first stage, and/or any images that were not processed during the first stage. |
| -b n | Perform auto-bracketing on each input image. Create lighter and/or darker versions of each input image (adjusted by n stops) before performing fusion. If neither "+" nor "-" is specified (e.g. -b 1.5) then both lighter and darker images are created. If "+" is specified (e.g. -b +1.5), then only a lighter version is created. If "-" is specified (e.g. -b -2.0), then only a darker version is created. |
| -w | Blend across -180/+180 boundary (left/right edge of image). Use with 360 degree images where left and right edges of image are continuous. |
| -h | Shows help message |
| -v | Show verbose output |
| -V | Show version, license and credits |
| Weighting Options (weights for contrast+saturation+exposure should equal 1 for each iteration) | |
| --wMode1 n | Laplacian combination mode for iteration 1. Default=1 (Maximum) |
| --wMode2 n | Laplacian combination mode for iteration 2. Default=0 (Weighted Average) |
| --wMode n | Laplacian combination mode for both iterations. (0=Weighted Average, 1=Maximum) |
| --wExposure1 n | Weight for well-exposed pixels for iteration 1. Default=0.00 |
| --wExposure2 n | Weight for well-exposed pixels for iteration 2. Default=1.00 |
| --wExposure n | Weight for well-exposed pixels for iteration 1 & 2 |
| --wContrast1 n | Weight for contrasty pixels for iteration 1. Default=1.00 |
| --wContrast2 n | Weight for contrasty pixels for iteration 2. Default=0.00 |
| --wContrast n | Weight for contrasty pixels for iteration 1 & 2 |
| --wSaturation1 n | Weight for saturated pixels in iteration 1. Default=0.00 |
| --wSaturation2 n | Weight for saturated pixels in iteration 2. Default=0.00 |
| --wSaturation n | Weight for saturated pixels in iteration 1 & 2 |
| Exposure Weight Curve Options | |
| --cCo n | Contrast: Specifies width (or "spread") of weight curve. Lower values give less weight to exposures that are far from mean than higher numbers. Default=0.2 |
| --cBr n | Brightness: Determines center of weight curve. Range=0 (dark) to 1 (light), default=0.5 (midtones) |
| -C | Print exposure weight curve values, and URL for exposure chart |
| Expert Options | |
| -f | Keep intermediate fused images produced after 1st iteration upon completion |
| -e n | Exposure difference threshold in stops (Default=0.33). Threshold for determining if exposures are the same or similar enough to be focus blended. |
| -z n | Exposure weight creation mode: 0=Greyscale (default), 1=Color. Determines if color or greyscale images should be used when computing exposure quality. |
| -k n | Gamma (Default=2.20). Used to linearize image data when calculating relative exposures. |
Here are some examples of how to invoke TuFuse:
- tufuse -o output.tif input1.tif input2.tif input3.tif input4.tif Performs a two stage fusion process and produces a focus and/or exposure blended result named output.tif
- tufuse -e 1.0 -o output.tif input1.tif input2.tif input3.tif input4.tif Performs a two stage fusion process and produces a focus and/or exposure blended result named output.tif. Images that have an exposure within 1 stop of each other are considered to have a similiar exposure, and will be focus blended in first iteration.
- tufuse -p 1 *.tif Performs a single fusion iteration (optimized, by default, for focus blending) on all tiff files in current directory. Output name will be chosen by TuFuse and written to current directory.
- tufuse -p 1 --wMode 0 --wContrast 0 --wExposure 0.5 --wSaturation 0.5 *.tif Performs a single fusion iteration using a quality measure based equally on exposurure and saturation (contrast is ignored). Output is comprised of a weighted average (weighted by quality) of input pixels. All tiff files in current directory are processed, and output name will be chosen by TuFuse and written to current directory.
- tufuse -a 16 -b 1.5 -o output.tif IMG_0100.CR2 Performs "auto-bracketing" on a single RAW file (CR2 format). TuFuse creates a lighter and darker version of the input file (adjusted by +1.5 and -1.5 stops) and then fuses these with the input raw file, saving the result as a 16 bit output file named "output.tif".
- tufuse -a 16 --compression DEFLATE -b +0.8 -o output.tif IMG_0100.CR2 Same as above except only a lighter version (adjusted by 0.8 stops) of the file is created for "auto-bracketing", and the output file uses DEFLATE compression.
Image Alignment and GUI. TuFuse is designed to operate on images that are perfectly aligned. Unless another program is used to "align" the images, it is recommended that the images used by TuFuse be captured using a camera mounted on a tripod, and that the camera's shutter be triggered by a remote control so the camera is not moved between exposures. TuFuse is a command line program and does not have a graphical user interface (GUI). However, it is designed to operate with (and is distributed with) PTAssembler, which serves as a graphical interface (GUI) for TuFuse (and much more), and can align misaligned images and invoke TuFuse to create single or panoramic images. A number of examples created by PTAssembler and TuFuse are on this page.
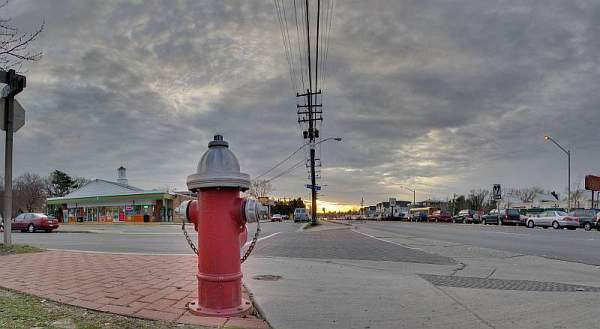
27 different images (not shown here) fused into six exposure and focus blended
composite images, and then stitched into a two row mosaic image. Created by PTAssembler
Downloads.
- Tufuse 1.60 (64 bit)
- Tufuse 1.60 (32 bit)
- Tufuse 1.50 (previous version)
- PTAssembler. A graphical interface for TuFuse that can also align images before invoking TuFuse.
Distribution Status. TuFuse is freeware, and can be used without restriction. TuFuse comes with no warranty and TawbaWare and the author take no responsibility for any damages caused by the use of this program. Unauthorized redistribution of this program is prohibited. Packaging and/or distributing this program with any other program is prohibited without the explicit written consent of the author.